RCE Endeavors 😅

October 6, 2021

Making a Discord Chat Bot using Markov Chains (1/2)

Filed under: Programming — admin @ 12:34 PM

Introduction

Markov chains are a really interesting statistical tool that can be used to model phenomena in a wide range of fields. They can be found in the natural sciences, information theory, economics, games, and more. They are commonly used to model stochastic processes, or more informally, a set of random variables that change over time. Markov chains can be expressed in several different notations, though the most common, and the one that will be used for this post, will be as a weighted directed graph. An example of a Markov chain is shown below:

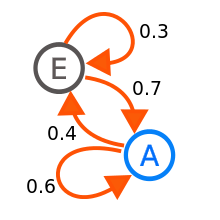
This Markov chain has two states, denoted by vertices A and E. Each vertex has incoming and outgoing edges, with each edge having a weight value associated with it corresponding to a probability. For example, starting at state A, there is a 40% chance that the next state will be a transition to state E, and a 60% chance that the next state will stay at A. In order to be a Markov chain, the sum of all outgoing edge weights for every node must add up to 1.0 (100%); if we start at a vertex then we have to make a move somewhere in the next step. The other characteristic is that the future only depends on the immediate past: the probability of transitioning to any particular state is dependent solely on the current state, and not on the sequence of state transitions that happened earlier in time. This gives Markov chains the property of being memoryless.

An example

Despite initially seeming complex, creating a basic Markov chain is pretty straightforward. To create the Markov chain, we need to take the input corpus of text and build a directed graph for it. Each vertex in this graph will correspond to a word, and each vertex will have an edge to an adjacent word. Then, to generate a sentence, we can start with a seed word and perform a random walk starting from the seed word up to a specified length.

As an example, look at the following input text:

A paragraph is a self-contained unit of discourse in writing dealing with a particular point or idea. A paragraph consists of one or more sentences. Though not required by the syntax of any language, paragraphs are usually an expected part of formal writing, used to organize longer prose.

To quickly build a directed graph for this, we can utilize a dictionary. Each key in this dictionary will correspond to a vertex, and the list of values for this key will correspond to edges.

{
  'a': ['paragraph', 'self-contained', 'particular', 'paragraph'],
  'paragraph': ['is', 'consists'],
  'is': ['a'],
  'self-contained': ['unit'],
  'unit': ['of'],
  'of': ['discourse', 'one', 'any', 'formal'],
  'discourse': ['in'],
  'in': ['writing'],
  'writing': ['dealing', 'used'],
  'dealing': ['with'],
  'with': ['a'],
  'particular': ['point'],
  'point': ['or'],
  'or': ['idea', 'more'],
  ...
}

If we look at the dictionary output and reference the original text, we can better understand how it was built. Looking through the text, for every instance where the word a appears, we store its adjacent word. In this case, there were four places where the word a had an adjacent word:

A paragraph is …

a self-contained unit of discourse …

a particular point or idea …

A paragraph consists of one ….

The same logic follows for paragraph, is, and so on. One important thing to note is that the keys are not case sensitive. The occurrence of A and a in the text are treated as being the same word, which is a behavior that we desire. Aside from capitalization, there are also other features from the text that we would like to transform or filter out: punctuation marks, newlines, extraneous spaces, and non-printable characters should be removed from the text before the Markov chain is built. Doing this normalization process will help make the output look more consistent with how real sentences are structured.

Another important feature to notice is that there are repetitions: you can see the word paragraph multiple times for the key a. This is done for the simplicity of implementation — we are creating redundant edges from a vertex instead of building and updating a transition matrix. With the redundant approach, we can just randomly select among any edge to transition to and not have to explicitly keep track of probabilities. This has the benefit of making building the model, and generating sentences, easier, since there is no need to build and apply a transition matrix. However, there is the obvious downside of a much greater memory overhead.

Having said that, the code for everything is shown below:

import argparse
import collections
import os.path
import random
import re
import sys

def generate_sentence(markov_table, seed_word, num_words):
    if seed_word in markov_table:
        sentence = seed_word.capitalize()
        for i in range(0, num_words):
            next_word = random.choice(markov_table[seed_word])
            seed_word = next_word

            sentence += " " + seed_word

        return sentence
    else:
        print("Word {} not found in table.".format(seed_word))

def create_markov(normalized_text):
    words = normalized_text.split()
    markov_table = collections.defaultdict(list)
    for current, next in zip(words, words[1:]):
        markov_table[current].append(next)

    return markov_table

def normalize_text(raw_text):
    pattern = re.compile(r"[^a-zA-Z0-9- ]")
    normalized_text = pattern.sub("", raw_text.replace("\n", " ")).lower()
    normalized_text = " ".join(normalized_text.split())

    return normalized_text

def main(args):
    if not os.path.exists(args.inputfile):
        print("File {} does not exist.".format(args.inputfile))
        sys.exit(-1)

    with open(args.inputfile, "r", encoding="utf-8") as input_file:
        normalized_text = normalize_text(input_file.read())

    model = create_markov(normalized_text)
    generated_sentence = generate_sentence(model, normalize_text(args.seed), args.numwords)

    print(generated_sentence)

if __name__ == "__main__":
    parser = argparse.ArgumentParser()
    optional = parser._action_groups.pop()

    required = parser.add_argument_group("required arguments")
    required.add_argument("-i", "--inputfile", required=True)
    required.add_argument("-s", "--seed", required=True)

    optional.add_argument("-n", "--numwords", nargs="?", default=int(30))

    parser._action_groups.append(optional) 
    args = parser.parse_args()

    main(args)

This script takes an input file, a seed word, and an optional max number of words to generate. It will then open and read the input file, normalize the text, build the Markov chain, and generate a sentence. Running this script against a larger corpus of text, such as the first two chapters of Hackers, Heroes of the Computer Revolution can produce some pretty funny output:

His group that had a rainbow-colored explosion of an officially sanctioned user would be bummed among the kluge room along with

A sort of the artistry with owl-like glasses and for your writing systems programs–the software so it just as the computer did the clubroom

This particular keypunch machines and the best source the execution of certain students like a person to give out and print it

Having learned a bit more about Markov chains, the next part will cover the steps needed to build a Discord bot that utilizes them to generate chat messages.

May 18, 2021

Creating a multi-language compiler system: System Setup (11/11)

Filed under: Programming — admin @ 10:30 PM

Table of Contents:

This post will explain how to set up the multi-language compiler system on Ubuntu 20.04. Given that everything is containerized, it hopefully shouldn’t be too bad to set up if you want to try it in action.

Starting with a fresh install, some dependencies are needed:

Once these prerequisites are met, the code repository can be cloned from Github:

git clone https://github.com/codereversing/multicompilersystem

Once the repository is cloned, the shared mounted folder needs to be created. In the Kubernetes deployment files this local path is /home/${USER}/Desktop/shared, so take the folder called shared from the repo and place it in /home/${USER}/Desktop/.

Read/write/execute permissions should be set on this shared folder as well so that the containers can properly perform their operations on the subdirectories within it. Replace ${USER} with the current user name.

chmod -R 777 /home/${USER}/Desktop/shared

After this is done you can run the build-all-dockerfiles.sh script followed by the deploy-all.sh script. If everything worked you should see a folder with the running container id in the shared folders input, output, etc directories. From here you can follow the previous post giving a demo of the system to try it yourself.

Creating a multi-language compiler system: Conclusion (10/11)

Filed under: Programming — admin @ 10:30 PM

Table of Contents:

This concludes the series on creating a multi-language compiler system. Just from the length and number of posts, it is clear that a lot goes into creating something like this. Through this series of posts, a full, feature-rich, end-to-end pipeline was developed that can do the following:

  • Take in an arbitrary input file for a supported language
  • Compile (if needed) and execute the source code
  • Provide console arguments to the executable
  • Provide interactive input to the executable at runtime
  • Run in multi-threaded mode and support multiple compilations and executions at the same time
  • Provide a degree of security through isolation of compilation and low-privilege execution in a containerized environment
  • Provide time limits on how long a compilation and execution process can take
  • Allow for scaling the number of system pods by language
  • Isolate language-specific environment setup so that new languages can be added easily

Overall, not too bad for a project that took a couple of weekends. But as always, there are things that are missing or that could be improved. I hope that anyone who took the time to go through these posts has learned something from them and gets a better understanding of how these multi-language compiler systems work.

Creating a multi-language compiler system: Demo (9/11)

Filed under: Programming — admin @ 10:30 PM

Table of Contents:

This post will present a demo of the system in action. It aims to demonstrate how to take an input source file and get the output execution. Basic usage is covered, as well as the more advanced features of command-line input and interactive sessions. The post then wraps up by testing the timeout and autoscaling resiliency features of the system.

Basic input

After launching the system, the shared mount between container(s) and hosts will contain a folder in the various directories corresponding to the containers unique identifier.

One C compiler instance has been launched. Its folder is shown above.

As shown above, the input directory now contains a folder, 2cd0b1…, which is mapped to the input folder for the running container. If multiple containers are running then multiple uniquely named folders would be present here. This input folder will be the location where C source language files are dropped. For example, take the following short C program,

#include <stdio.h>

int main(int argc, char *argv[])
{
    fprintf(stdout, "Hello, World! stdout\n");
    fprintf(stderr, "Hello, World! stderr\n");
    // fprintf(stdout, argv[1]);
    return 0;
}

After saving this as a file called test.c, putting it into the 2cd0b1… directory, you will notice that the file seems to disappear. This is because the file watcher has picked up the addition of the new file to the directory and has kicked off the compilation and execution process. Navigating to the output directory, you will see a folder with the same name, 2cd0b1…. Inside of this folder is another folder simply called 0.

Folder 0 is present after adding the input source file.

These are folders that are named sequentially for each input that has ran, i.e. the first input source files output will be placed in folder 0, the second one in folder 1, etc. Navigating inside this 0 folder, there is a file called test.c.log. Opening that file up, you can see the output and return code of the code that has just been compiled:

{
    "result": {
        "return": 0,
        "output": "Hello, World! stdout\r\nHello, World! stderr\r\n"
    }
}

Introducing a syntax error, i.e. removing a semicolon from test.c and trying again gives different output. After making those changes and adding it to the input directory, there will be now be a folder called 1 to correspond to this next execution of the system. The test.c.log file in that folder has the following output, showing that the compiler output has been captured and that there is an error:


{
    "result": {
        "return": 0,
        "output": "/home/user/code/share/c/workspace/2cd0b1c89028aeb0283a56deb091ce24a626febda22c7eaf79a31dd2105e5c42/1/test.c: In function 'main':\n/home/user/code/share/c/workspace/2cd0b1c89028aeb0283a56deb091ce24a626febda22c7eaf79a31dd2105e5c42/1/test.c:5:46: error: expected ';' before 'fprintf'\n     fprintf(stdout, \"Hello, World! stdout\\n\")\n                                              ^\n                                              ;\n     fprintf(stderr, \"Hello, World! stderr\\n\");\n     ~~~~~~~                                   \n"
    }
}

This same process can be repeated with files of any supported language.

Command-line arguments

It is easy to test command-line arguments by uncommenting the line that prints the value of argv[1] in the test.c program above. For command-line arguments to be properly passed in, they need to be specifies in a dedicated file as well. This file should have the same name as the input, with the .args extension added at the end. So just create a test.c.args file with the value of the command-line argument, i.e. “123”. Take this file and add it to the arguments folder for the container

test.c.args being added to the arguments folder of the container

Next add the test.c input file to the input folder again. You should see the source file disappear and a new folder called 3 (for third execution) be created in the output folder if the system is still up. As before, inside this folder, there is a test.c.log file. That log file now contains the original input plus the command-line argument as part of the output:

{
    "result": {
        "return": 0,
        "output": "Hello, World! stdout\r\nHello, World! stderr\r\n123"
    }
}

Interactive sessions

Now lets try an interactive session; this time we will use Java. To do this, we need a Java file that reads in command-line input at runtime. That is easy enough to do and the code for it is shown below:


import java.io.BufferedReader; 
import java.io.IOException; 
import java.io.InputStreamReader; 

public class MyTestClass {
  public static void main(String[] args) throws IOException {
    System.out.println("Hello, World! stdout");
    System.err.println("Hello, World! stderr");
    
    BufferedReader reader = new BufferedReader( 
            new InputStreamReader(System.in)); 
  
    for(int i = 0; i < 5; i++)
    {
        String name = reader.readLine(); 
        System.out.println("You entered: " + name);
    }
  }
}

The process for an interactive session is similar to providing a command-line arguments: we need a dedicated file to store the input session state. This time, instead of creating an .args file with command-line input, we will create an empty .stdin file named test.java.stdin. This will be placed in the stdin folder of the container running the Java compiler system.

An empty test.java.stdin file inside the stdin folder of the Java container.

After this file is placed in the stdin folder, the test.java file can be placed into the input folder. After placing the file in the input folder you will notice that it did not disappear. This is because the interactive process is taking place and the source file is not cleaned up until the last step in the compilation and execution process. Now that an interactive session is established, it is time to provide input via the .stdin file. For this it is best to use a text editor such as vim or similar which does not perform any intermediate saves or newline formatting.

Five lines of input for the example run.

Each line of input is forwarded to the stdin of the running Java process. This input was generated by typing a line and saving the test.java.stdin file. After saving the fifth line, the input file disappeared and a test.java.log file was generated in the output directory. This log file shows the input from the .stdin file being properly being forwarded to the running process as if it was entered on the keyboard:

{
    "result": {
        "return": 0,
        "output": "Hello, World! stdout\r\nHello, World! stderr\r\nfirst input\r\nYou entered: first input\r\nnext input\r\nYou entered: next input\r\na longer line bigger input\r\nYou entered: a longer line bigger input\r\nfourth line input\r\nYou entered: fourth line input\r\nlast line put\r\nYou entered: last line put\r\n"
    }
}

Timeouts

Testing timeouts is pretty straightforward. The default timeout value for a non-interactive session is 10 seconds, so we can just test a program with an infinite loop and wait. If everything works correctly then the process should be killed after the maximum timeout value. For variety, we can test this with Python. To do this, we can create a Python input file that does nothing but a print-sleep loop:

import sys
import time

while True:
    print("Hello, World!", file=sys.stdout)
    time.sleep(1)

After adding this to the input folder of the Python container, we can wait for 10 seconds. After this amount of time the input file should disappear and there should be a file present in the output directory. The contents of this file show that the timeout was indeed hit as ten messages were printed:

{
    "result": {
        "return": 0,
        "output": "Hello, World!\r\nHello, World!\r\nHello, World!\r\nHello, World!\r\nHello, World!\r\nHello, World!\r\nHello, World!\r\nHello, World!\r\nHello, World!\r\nHello, World!\r\nHello, World!\r\n"
    }
}

Scaling

The last bit of the system to test out is the autoscaling. If we take a test input file, create hundreds of copies of it, and add it to the input directory of a target language container, we can trigger the autoscaling to kick in as CPU and memory resources will begin to be heavily utilized. When new instances come up, they will create a unique folder in the various directories. Under a more resilient system, the input file load from the initial instance would be redistributed across the new instances that scaled in. Shown below is what happened after adding a lot of stress to the single container pod that was up:

Five new instances were scaled in due to the high load on the pod.

Kubernetes will take pods out of service after some time when the CPU and memory utilization stabilizes. After waiting around five minutes on my machine, the underutilized pods were taken out of service and shut down.

One container remains after the rest have been shut down.

Creating a multi-language compiler system: Kubernetes (8/11)

Filed under: Programming — admin @ 10:29 PM

Table of Contents:

This post will cover how to add Kubernetes as an orchestration layer for the Dockerfiles that were created in the previous post. Right now, each language has its own dedicated container environment to run it. However, launching these Dockerfiles is a manual process, and these files do not automatically scale with user input. If we have a C++ compiler system running and provide it with a constant stream of input files, the system will eventually back up if the rate of compilation and execution is greater than the rate of input files being added. It would be nice to automatically launch Docker containers to handle this increased load, and alternatively it would be nice to automatically kill off extra Docker containers that are idle for long periods of time. This is where Kubernetes comes in to the picture.

I won’t go into much detail about Kubernetes; their interactive tutorials cover more ground than I ever could in a blog post. All that I will mention is that it is an exceptionally feature rich and complex platform for automating deployments, scaling, and general orchestration of containers. As part of this multi-language compiler system, the only features that we care about are autoscaling and mounting a partition to the host.

Deployment configuration

The Kubernetes deployments for each language is provided in a deployment.yaml file. This file provides a spec for the containers for CPU and memory limits, as well as volume information for where the shared mount volume. This shared mount volume is needed as an easy way to provide input source files to the running containers, as containers cannot have access to the host filesystem. Exposing mounted volumes to containers can be a security risk and was explicitly chosen to keep the system simple, as opposed to fully secure. A deployment.yaml file is shown below:

apiVersion: apps/v1
kind: Deployment
metadata:
  name: test-compiler-c
  namespace: default
spec:
  replicas: 1
  selector:
    matchLabels:
      compiler: c
  template:
    metadata:
      labels:
        compiler: c
    spec:
      containers:
      - name: compiler-base-c
        image: localhost:32000/compiler-base-c:latest
        resources:
          requests:
            memory: "512Mi"
            cpu: "100m"
          limits:
            memory: "1024Mi"
            cpu: "1000m"
        volumeMounts:
        - mountPath: /home/user/code/share
          name: io-shared-volume
        lifecycle:
          preStop:
            exec:
              command: ['sh', '-c', './shutdown.sh']
      volumes:
      - name: io-shared-volume
        hostPath:
          path: /home/{{USER}}/Desktop/share
          type: Directory
---
apiVersion: autoscaling/v2beta2
kind: HorizontalPodAutoscaler
metadata:
  name: test-compiler-c
spec:
  scaleTargetRef:
    apiVersion: apps/v1
    kind: Deployment
    name: test-compiler-c
  minReplicas: 1
  maxReplicas: 10
  metrics:
  - type: Resource
    resource:
      name: cpu
      target:
        type: Utilization
        averageUtilization: 75
  - type: Resource
    resource:
      name: memory
      target:
        type: AverageValue
        averageValue: 800Mi
  

This particular file is for the C compiler environment. The container compiler-base-c will be launched under this deployment configuration. This container will have the resources specified under the resources section and have a mounted volume that will be visible as /home/user/code/share on the container. This mounted volume will map to the host at path /home/{{USER}}/Desktop/share where {{USER}} will be replaced by the current username when the deployment script is run. When the container is set to shut down, it will invoke the “sh -c ./shutdown.sh” command to clean up.

The latter half of the deployment.yaml file specifies the autoscaling configurations. These containers will scale based on two resource limmits: CPU and memory. If the CPU utilization averages above 75% then Kubernetes will scale in another container pod. Likewise, if the average memory usage is above 800 MB then the same will happen. The minReplicas and maxReplicas specify the minimum and maximum number of container pods that may be active at any given time. Kubernetes will continue to scale the number of container pods up to a maximum of ten if the memory and/or CPU usage is consistently high. If pods become underutilized then they will be automatically taken out of service and killed until there is one pod remaining.

Deployment script

The script to perform a deployment is shown below. The script will perform a deployment for each supported language. There is some logic to substitute the {{USER}} field in the deployment file, but the rest is a straightforward call to the Kubernetes command-line tool kubectl to do the deployment.

#!/bin/bash

LANGUAGES="c cpp cs java py"

for LANGUAGE in $LANGUAGES; do
    CURRENT_USER=${USER}
    REPLACE_USER=`cat "Deployments/${LANGUAGE}/deployment.yaml" | sed "s/{{USER}}/$CURRENT_USER/g"`
    echo "Deploying containers for ${LANGUAGE}"
    echo "$REPLACE_USER" > Deployments/${LANGUAGE}/deployment.runtime.yaml
    sudo microk8s.kubectl apply -f Deployments/${LANGUAGE}/deployment.runtime.yaml
    echo "Deployed containers for ${LANGUAGE}"
done

This fully covers it for the design and implementation of the multi-language compiler system! As described throughout these posts, the system has support for multiple languages, interactive input, multi-threading, and a scalable production deployment in a containerized environment. The next post will show off a demo of the system in action.

« Newer PostsOlder Posts »

Powered by WordPress