RCE Endeavors 😅

November 18, 2021

Reverse Engineering REST APIs: Debugging (4/12)

Filed under: Game Hacking,Programming,Reverse Engineering — admin @ 2:15 PM

Table of Contents:

The simplest way to begin reverse engineering an application is to look for hints from inside the application itself as to what it is doing. In a dynamic analysis setting, where we are going to examine a running executable, this is best done by attaching a debugger to it. From there we can begin looking at string references and see if there is anything interesting.

For example, our target goal is to find the request builder and response decryption functions in the target executable. After attaching a debugger, we can do a string dump and look for values such as “packet”, “encrypt”, “decrypt”, “message”, “response”, etc. and see if we can get any leads into where these functions might be located. We can also try to find out if they are implemented internally, or via a third-party library, and what encryption libraries are used, as well as other relevant features of the client-server communication flow.

To begin, lets attach x64dbg to the Age of Empires IV executable (RelicCardinal.exe). From the module view in the Symbols tab, we can find the main executable.

Once we are viewing the main module (via double clicking the row with reliccardinal.exe), we can take a look at the string references (right click, Search for -> Current Module -> String references).

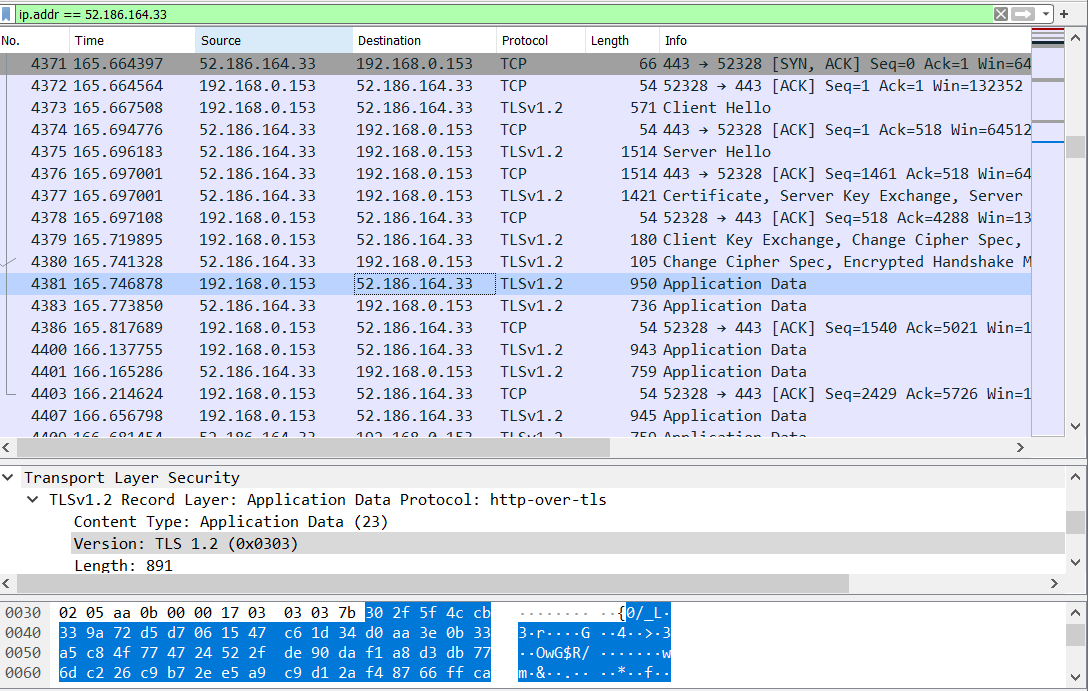
From inspecting the network traffic previously, we know that TLS is being used to perform secure calls to the server. We can take a look for strings such as “encrypt”, “decrypt”, “tls”, and “ssl” to see if there is anything interesting. The first three searches didn’t yield anything too much, however, when looking for “ssl”, there is something notable. There is a string reference to SSLKEYLOGFILE.

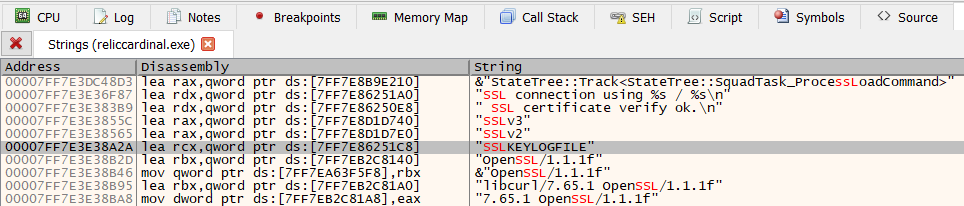
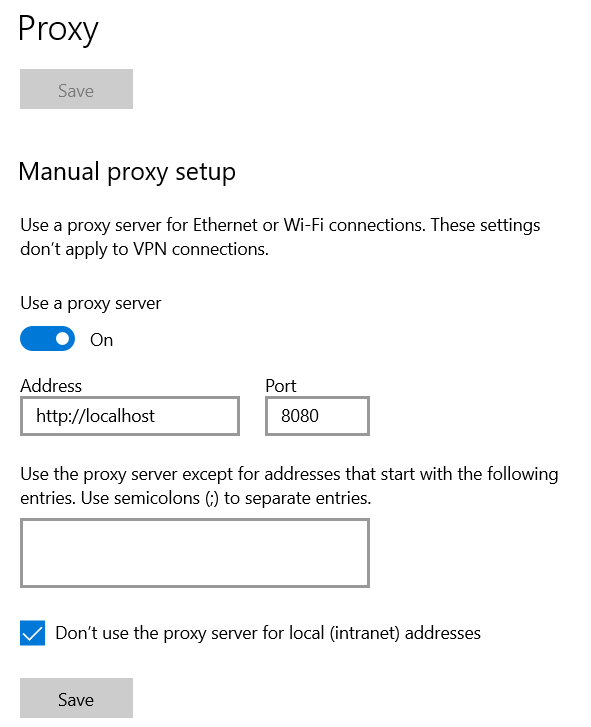
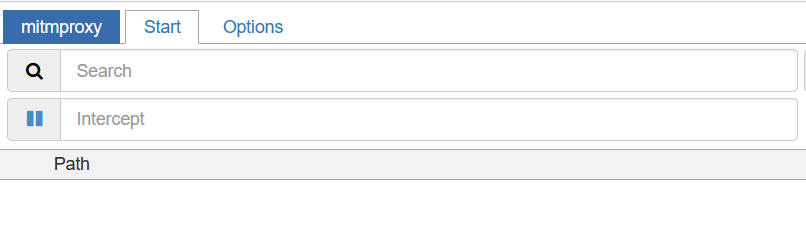
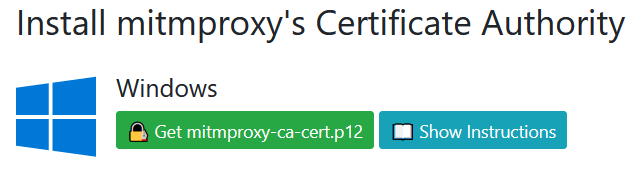
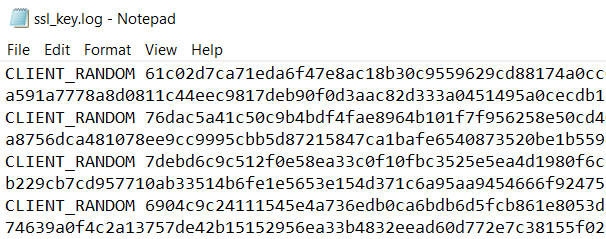
SSLKEYLOGFILE is a special environment variable that can be set to log SSL key information. The contents of this file can then be used by Wireshark to decrypt the network traffic. If the game supports the use of this environment variable then it is another way to see the plaintext network traffic without having to deal with the hassle of setting up a HTTPS proxy and routing the application traffic through it. To test it is simple: create an environment variable called SSLKEYLOGFILE and set its value to a path on your filesystem. Then launch the game and see if anything is written out to the file. If you’ve done it successfully, there should be SSL key information in the file, confirming that the use of this environment variable is enabled.

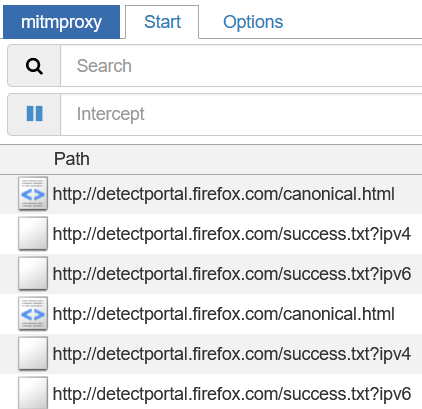
Having this key information, we should be able to see decrypted data in Wireshark. To see this, we can launch Wireshark and begin monitoring. We then launch the game and perform some actions to ensure REST calls are being made. Finally, we import the SSL key information in Wireshark via Edit -> Preferences -> Protocols -> TLS and provide the SSL key file.

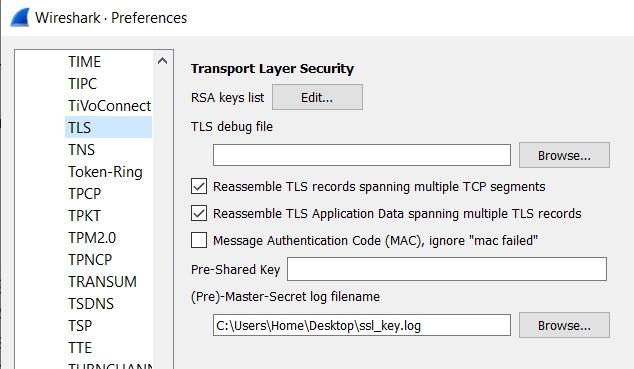
Once these changes are applied, we can filter out traffic to the server and verify that the decrypted application data is visible.

The decrypted requests appear to be present. We can view the full request-response flow by right clicking on a request and selecting Follow -> HTTP Stream

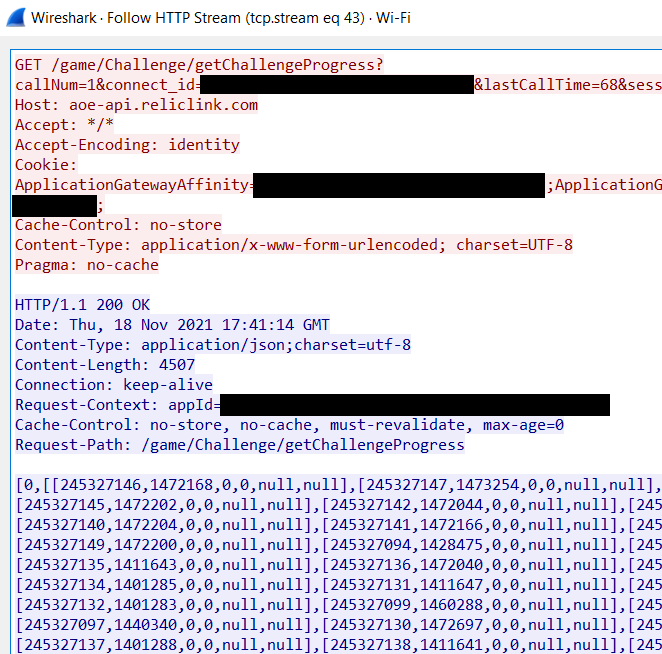
This quick find provided all of the insight needed to reverse engineer the REST APIs. But what if the SSLKEYLOGFILE environment variable was unsupported? We would have to dig a bit deeper into the strings dump, which we’ll do while we’re here anyway. Searching for “http” provides some interesting information:

"handle_read_http_response"
"handle_send_http_request"

These appear to be WebSocket functions. These are good to know, but probably not what we are interested in, as the client-server communication we are reverse engineering is not done via WebSockets. If these functions are used, it is probably from within a multiplayer game instance where the lower overhead full-duplex connection that WebSockets provide is a good choice.

"%s HTTP/%s\r\n%s%s%s%s%s%s%s%s%s%s%s"

This looks like a format string for an HTTP request.

"HTTP_E_STATUS_UNEXPECTED"
"HTTP_E_STATUS_UNEXPECTED_SERVER_ERROR"
"HTTP_E_STATUS_UNEXPECTED_CLIENT_ERROR"
"HTTP_E_STATUS_UNEXPECTED_REDIRECTION"
...

These are constants used by the Xbox Live Networking library.

"https://sessiondirectory.xboxlive.com/connections/"
"https://userpresence.xboxlive.com/users/xuid("
"https://vortex-win.data.microsoft.com"
"https://vortex-events.xboxlive.com"
...

Different endpoints that may be called by the game. These can be useful as filters in Wireshark at some point, but not relevant to the endpoint that we are interested in.

"HCHttpCallPerformAsync"
"HCHttpCallRequestSetHeader [ID %llu]: %s=%s"
"HCHttpCallRequestSetRequestBodyBytes [ID %llu]: requestBodySize=%lu"
"HCHttpCallRequestSetRetryAllowed [ID %llu]: retryAllowed=%s"
"HCHttpCallRequestSetRetryCacheId [ID %llu]: retryAfterCacheId=%d"
"HCHttpCallRequestSetTimeout [ID %llu]: timeoutInSeconds=%u"
"HCHttpCallRequestTimeoutWindow: %u"
"HCHttpCallRequestSetUrl [ID %llu]: method=%s url=%s"
"HCHttpCallResponseAppendResponseBodyBytes [ID %llu]: bodySize=%llu (total=%llu)"
"HCHttpCallResponseGetResponseString [ID %llu]: responseString=%.2048s"
"HCHttpCallResponseSetResponseHeader [ID %llu]: Duplicated header %s=%s"
"HCHttpCallResponseSetResponseHeader [ID %llu]: %s=%s"
"HCHttpCallResponseSetErrorCode [ID %llu]: errorCode=%08X (%08X)"
"HCHttpCallResponseSetErrorMessage [ID %llu]: errorMessage=%s"
"HCHttpCallResponseSetResponseBodyBytes [ID %llu]: bodySize=%llu"
"HCHttpCallResponseSetStatusCode [ID %llu]: statusCode=%u"

This is a large set of functions related to constructing HTTP requests and retrieving HTTP responses. These come from the Xbox Live API and the functions that reference these strings seem like good candidates for investigation. There are additional references to libHttpClient, which is another library that works in conjunction with Xbox Live API. The API is pretty comprehensive and provides wrappers for WebSockets, REST APIs, and curl-like functionality with Microsoft’s xCurl implementation. As we begin to reverse engineer the executable, these sets of functions will be good to keep in mind.

Going through the string references has revealed a lot of good information about what is going on with respect to the networking functionality. We were lucky to find that the SSLKEYLOGFILE functionality is supported, and also picked up some good leads regarding functions to investigate. The next series of posts will take a look at these functions, and more, with the goal of finding the relevant code for building requests and processing responses.

Reverse Engineering REST APIs: Basics (3/12)

Filed under: Game Hacking,Programming,Reverse Engineering — admin @ 9:54 AM

Table of Contents:

This next series of posts will describe how to reverse engineer a client application in order to find out how it communicates with a server. Specifically, what we will find throughout the rest of the series, is how the Age of Empires IV game builds requests and decrypts responses. This will be done in multiple steps: first, we will do some basic analysis on the application with a debugger attached, then we will begin to look at the networking functions that the game uses in order to perform client-server communication. From there, we will look deeper into the game logic and reverse engineer the internal functions that build and decode messages. Lastly, we will wrap by up hooking these internal functions in order to see the decrypted content, which will grant us full control over what is being sent and received.

To do this is going to require a set of tools and libraries. Below is what will be used throughout the rest of this series:

  • Tool: x64dbg – A great debugger for x86/x64
  • Tool: Visual Studio 2022 – This will be used to develop and debug the API hook DLL
  • Library: Detours – We will use this library to perform the API hooking
  • Library [optional]: Catch2 – Used for writing unit tests

The tools were downloaded as is, and the libraries were downloaded and installed via vcpkg. The source is available for all of the code that will be written and discussed in this series.

November 17, 2021

Reverse Engineering REST APIs: The Easy Way (2/12)

Filed under: Game Hacking,Programming,Reverse Engineering — admin @ 4:33 PM

Table of Contents:

This post starts off the series by showing the easy way to reverse engineer REST APIs: by simply looking at the request and response flow. To start, we will launch the game and use Wireshark to look at the traffic going over the wire. In order to filter out the traffic, we need to find out what IP(s) the game is connected to. After launching the game and running netstat, we get the following output:

netstat -n -p TCP -b

...
 [RelicCardinal.exe]
  TCP    192.168.0.153:52322    52.186.164.33:443      ESTABLISHED
 [RelicCardinal.exe]
  TCP    192.168.0.153:52323    52.186.164.33:443      ESTABLISHED
 [RelicCardinal.exe]
  TCP    192.168.0.153:52324    23.200.0.183:443       ESTABLISHED
 [RelicCardinal.exe]
  TCP    192.168.0.153:52329    52.165.184.209:443     ESTABLISHED
 [RelicCardinal.exe]
  TCP    192.168.0.153:58611    52.226.139.185:443     ESTABLISHED
...

The game is connecting on port 443, which means that communication is happening over TLS. Looking at Wireshark, there is no useful data to be seen since everything is encrypted. At best you can extract the hostname information from the server name indication extension of TLS, though useful information like query strings and content bodies will still remain encrypted.

This is a minor inconvenience, but still an inconvenience nonetheless. To get at the decrypted data requires a few more steps: first, we need to set up a proxy that intercepts traffic over HTTPS, then we need to run the game through this proxy.

Setting up a HTTPS proxy is pretty straightforward: mitmproxy can be used for this. After installing the tool, navigate to the Windows Proxy Settings and add in a proxy running on localhost:8080

Once this is done, you can launch mitmweb.exe from the mitmproxy installation directory. After launching mitmweb.exe, a new browser tab should pop up showing intercepted network flows. This will likely be initially empty.

In order to intercept traffic, mitmproxy needs to install a root certificate. Once mitmweb.exe is running, navigate to mitm.it. If everything is working as expected, there should be options to install the mitmproxy certificate for various operating systems and devices.

After the certificate is installed, the proxy should be fully set up. You can restart mitmweb.exe and observe some traffic being intercepted.

At this point, the proxy is verified as working. You can try to launch the game and begin inspecting traffic. However, if you do that, you will notice that no traffic is coming through. The game will appear to be working fine: it will log in to the network, display messages, show available lobbies, and function just as before. This means that the game’s traffic is not being routed through the proxy that we set up.

This might seem like a big roadblock, but fear not. There are multiple tools that configure applications to run through a proxy. For this I used Proxifier, which is paid software but provides a free 30-day trial. After installing and launching Proxifier, configure the HTTPS proxy by navigating to Profile -> Proxy Servers…

In this prompt, fill in the address of the HTTPS proxy that was set up with mitmproxy.

Once this is done, traffic of every application will be routed through the mitmproxy. To verify, you can launch the game again and look in the mitmproxy tab. You should now see the various APIs that get called from within the game in their unencrypted form.

From here on, you can begin interacting with the game and seeing what messages are sent to the server as a result of your actions. Doing so will allow you to discover more APIs, and you can begin to get a better picture of how the client-server interaction drives what you see in the game. Once you are done monitoring the traffic, you can shut down Proxifier, mitmproxy, and disable the manual proxy settings in Windows.

This concludes the easy way to reverse engineer REST APIs: through the combination of a couple of tools we are able to quickly see the requests and responses that are being sent, even if TLS is being used. The rest of this series will focus on reverse engineering the game itself to get the unencrypted request and response payloads.

Reverse Engineering REST APIs: Introduction (1/12)

Filed under: Game Hacking,Programming,Reverse Engineering — admin @ 4:32 PM

This series of posts will focus on reverse engineering REST APIs. The APIs that will be discussed are those used by the Age of Empires IV lobby and matchmaking system. These are an internal set of APIs that the game uses in order to retrieve, display, and update information about your account. This includes APIs for your profile, completed challenges, items, news, chat messages, available game lobbies, and many more.

These posts will be broken down into an easy way and a hard, but fun, way to get the same results. The easy way is covered in the next post and shows how to configure third-party tools to intercept and display the data. The rest of the series will focus on the more difficult way of reverse engineering the actual game in order to retrieve the request and response content.

A link to each post is provided below:

October 6, 2021

Making a Discord Chat Bot using Markov Chains (2/2)

Filed under: Programming — admin @ 12:35 PM

Continuing on from the previous post, this post will describe the steps involved in creating a Discord bot to write randomly generated chat to a server. Before continuing with this post, make sure to set up a bot application and add it to your server.

There are four main steps needed to get up and running:

  • Get the corpus of chat text
  • Normalize the data
  • Build a Markov chain from the data
  • Connect to the server and listen for commands

Getting the chat text

Unlike the previous post, where we used an existing corpus of text, we now need to generate one ourselves. This text will come from historical chat messages for a particular server channel. We can simply grab this data and write the raw messages out to a file. To do the heavy lifting of interacting with Discord, we will rely on Discord.py. This library will also be used to build the bot functionality later on as well.

The library provides a set of client events that we can hook in to. For this, we need to implement a handler for the on_ready event. When this event is triggered, our chat scraper will get the channel information via get_channel, and then get the message history from the channel.history property. Once we have the message history, we just iterate over each message and write the message content out to a file. Put into code, it looks like the following:

async def on_ready(self):
    print("Logged on as {}!".format(self.user))

    channel = self.get_channel(self.channel_id)
    if channel is None:
        print("Could not find channel {}".format(self.channel_id))
        sys.exit(-1)

    print("Found channel #{} for id {}. Reading messages...".format(channel.name, self.channel_id))
    with open(self.output_path , "w+", encoding="utf-8") as output_file:
        async for message in channel.history(limit=None, after=self.last_date):
            output = message.content + "\n"
            output_file.write(output)

That’s it for getting the chat text. After running the chat scraper against a channel, there should be an output file containing the raw message content. The next step is to clean the data up a bit and normalize it.

Normalizing the data

As described in the previous post, we want to add a normalization step in our data processing. This is done with the goal of improving the quality of sentences that the Markov chain will generate. By standardizing on capitalization, filtering out punctuation, ignoring non-printable text, and filtering out data that isn’t considered chat, the Markov chain is better able to model sentence structure. To perform the normalization, a new script is created which takes an input file containing raw chat data, and an output path to write the normalized data to. The normalization is kept pretty basic: we read in a line of text, strip out unwanted attributes (non-alphanumeric characters, extra whitespace, URLs), and write the normalized line to the output file.

def normalize_text(line):
    if not line:
        return ""

    trimmed_line = " ".join(line.split())
    split_line = ""
    for word in trimmed_line.split(" "):
        if validators.url(word):
            continue

        split_line += word.lower() + " "

    if not split_line or split_line.isspace():
        return ""

    pattern = re.compile(r"[^A-Za-z ]+", re.UNICODE)
    normalized_line = pattern.sub("", split_line)

    return normalized_line

def main(args):
    print("Reading input file {}. Writing output to {}.".format(args.inputfile, args.outputfile));

    with open(args.outputfile, "w+", encoding="utf-8") as output_file:
        with open(args.inputfile, encoding="utf-8") as input_file:
            for input_line in input_file:
                output_line = normalize_text(input_line.rstrip())
                if output_line: 
                    output_file.write(output_line)

    print("Finished processing.")

After running the script, we have an output file with better data. It is certainly by no means perfect: normalizing chat messages is a very challenging problem. Even after stripping out some “non-chat” portions of the message, there are still issues with the data: a message may contain typos, a message may not be a complete sentence, a message can be non-nonsensical, i.e. a user spamming random keys, and a whole host of other issues. These issues are acknowledged, but hand-waved away in this post, since the purpose is to create a fun and simple chat bot, and not something that tries to generate the most realistic sentences possible.

Putting everything together into a bot

At this point, we should have enough knowledge to put everything together. We have the background information for how Markov chains work and how to create them, we have a (kind of) normalized data set to work with, and we have the appropriate library available to interact with Discord. We have to now glue these things together: we will create a program that takes in an input file containing chat data, and the bot token. This program will read the chat data and build the Markov chain for it — the code from the previous article will be re-used here. The bot will then connect to Discord and wait for on_message events. Once an event is received, the bot will generate a random sentence and send it to the channel. Putting this into code, you get the following:

import argparse
import collections
import discord
import random
import re

class MarkovBot(discord.Client):

    def __init__(self, args):
        discord.Client.__init__(self)

        self.token = args.token

        with open(args.inputfile) as input_file:
            text = input_file.read()

        self.markov_table = self.create_markov(text)
        self.word_list = list(self.markov_table.keys())

    def generate_sentence(self, markov_table, seed_word, num_words):
        if seed_word in markov_table:
            sentence = seed_word.capitalize()
            for i in range(0, num_words):
                next_word = random.choice(markov_table[seed_word])
                seed_word = next_word

                sentence += " " + seed_word

            return sentence
        else:
            print("Word {} not found in table.".format(seed_word))

    def create_markov(self, normalized_text):
        words = normalized_text.split()
        markov_table = collections.defaultdict(list)
        for current, next in zip(words, words[1:]):
            markov_table[current].append(next)

        return markov_table

    def run(self):
        super().run(self.token)

    async def on_ready(self):
        print("Logged on as {}!".format(self.user))

    async def on_message(self, message):
        if message.author == self.user:
            return

        response = ""
        if message.content == "!talk":
            response = self.generate_sentence(self.markov_table, random.choice(self.word_list), random.randint(7, 25))

        if response:
            await message.channel.send(response)

def main(args):
    client = MarkovBot(args)
    client.run()

if __name__ == "__main__":
    parser = argparse.ArgumentParser()
    optional = parser._action_groups.pop()

    required = parser.add_argument_group("required arguments")
    required.add_argument("-t", "--token", required=True)
    required.add_argument("-i", "--inputfile", required=True)

    parser._action_groups.append(optional) 
    args = parser.parse_args()

    main(args)

Usage

There are three scripts that need to be executed in order to get the bot running. These scripts are developed throughout this series and are also available on Github.

python .\chat_scraper.py -c <Channel ID> -t <Bot Token> -o <Raw Data Filename>
python .\text_normalizer.py -i <Raw Data Filename> -o <Normalized Data Filename>
python .\markov_bot_simple.py -t <Bot Token> -i <Normalized Data Filename>

Examples

Razer black plague for that whole thing the scene down with us

Betting on youtube. thats one hand into play occasionally.

Happening. im getting a fukkin animal not sure

Radio show. i completely forgot about it was brought portal ingredients. i dont like gme momentum has blue screen combo.

« Newer PostsOlder Posts »

Powered by WordPress